An exciting new tool in Civil Site Design/Corridor EZ v26 is the Vertical Grading Optimizer which can create vertical design profiles based on the parameters you set. Previously, the vertical best fit design profile was based on matching closely to the terrain (within preset cut/fill depths) and adding vertical curves. Mostly, you would remove these and start from scratch to meet criteria such as minimum and maximum grade.
Now, with Vertical Grading Optimizer, you can quickly create a vertical profile to use as a starting point for your design that incorporates design components (criteria) that you set.
Vertical Grading Optimizer is based on a genetic algorithm approach which assesses many designs against your criteria in order to achieve the design with the best Overall Fitness Score. The user is able to change the algorithm settings to assess more or less designs and change the mutation, crossover and random selection rates.
There are three components that can be selected for the designs to be scored against; Cut/Fill Depth, Grade and K-Value. You can set both a desired value and change the weighting of each of these components so that one may influence the Overall Fitness Score more than another.
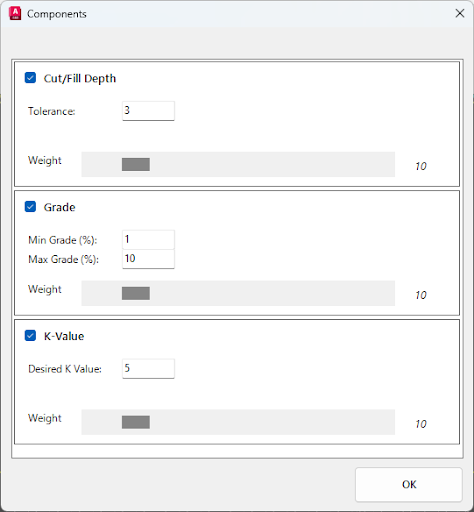
Image: String Optimizer Components form for setting desired values
The Vertical Grading Optimizer can be used for individual road or profile strings (accessed through the Optimize tab in the Vertical Grading Editor), or for an entire road network (accessed via the Roads tab, Road String drop-down).
How to use String Optimizer
To optimize a single string, open the Vertical Grading Editor and switch to the new Optimize tab. Here you can set the chainage range, maximum/minimum VC lengths and segment lengths (distance between IP’s). You can also access the Settings to change the algorithm values, and the Components to change the desired design values.
To run the optimization, there are two options; Optimize or Start.
If you click the Optimize icon, the algorithm will continue until it reaches the number of generations specified in the settings or until the rate of change in the overall fitness score is less than the value specified. If you click the Run icon, the algorithm will run until you click Stop.
When the Optimizer is finished, the result will be displayed along with the Overall Fitness Score in the bottom right corner of the VGE window.
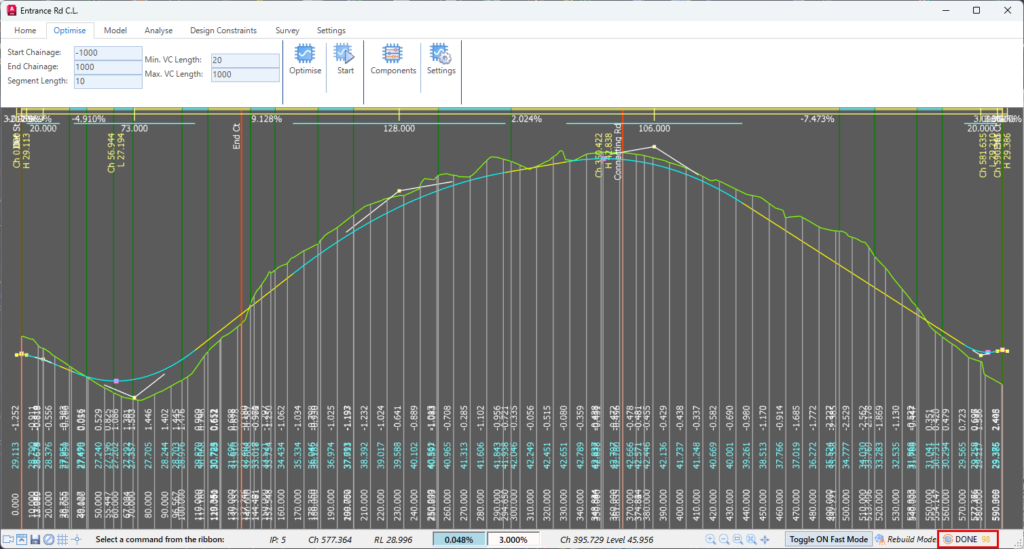
Image: Vertical Grading Editor showing an optimized design profile, Overall Fitness Score and Optimize tab open
Optimize Multiple Roads
If you wish to optimize multiple road strings, use the String Profile Optimizer command found in the Roads tab under the Road String drop-down. Here you can select road strings to be optimized and use the up and down arrows to reorder them. The first string on the list will be the first to be optimized, and any intersections formed with other strings will be maintained by the String Optimizer algorithm. The settings that can be changed are also displayed on this form, though it is important to note that the chainage cannot be specified and the entire road string will be optimized.
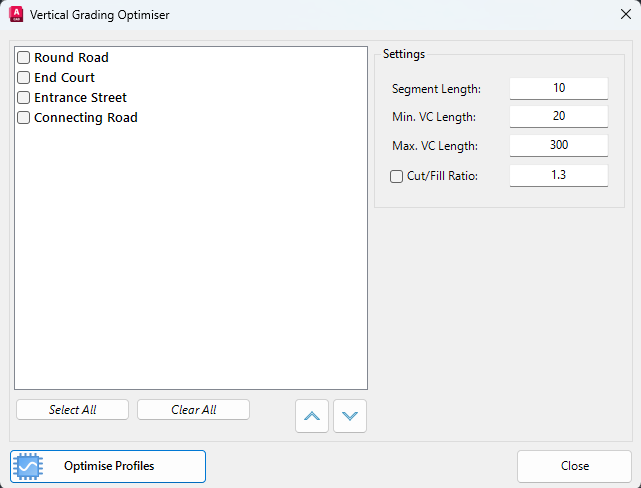
Image: Vertical Grading Optimizer form used to select and order multiple road strings for optimization.
When you click Optimize Profiles, the Components form will be displayed for you to set design criteria for all of the roads.
Click OK and the algorithm will run. A thinking icon ![]() will be displayed in the bottom right corner of the form which will chainage to a Done icon when the process is complete. You should then inspect and edit each road’s vertical profile to ensure the design is acceptable for your needs.
will be displayed in the bottom right corner of the form which will chainage to a Done icon when the process is complete. You should then inspect and edit each road’s vertical profile to ensure the design is acceptable for your needs.